������Դ��http://lanceme.blogspot.com/2013 ... et-sharing-for.html
�����ַ����ǽ�Ƿ��ʲ��˵ģ������Ұ�ԭ�ķ��������棬��������Ӧ�úܺ����⣬ͼ�IJ�ï�����Ծ�û�����룬���Ӧ�ÿ��ö�������в����ĵط���������˵�����һ���
I wish I better understood WHY this was necessary.
At one point my BBB \"just worked\". When it was plugged into my desktop computer via USB (Windows 7 machine) the BBB had internet connectivity just fine. After working to solve other issues it stopped. In any case, it works again with the following steps:
On the Windows 7 computer:
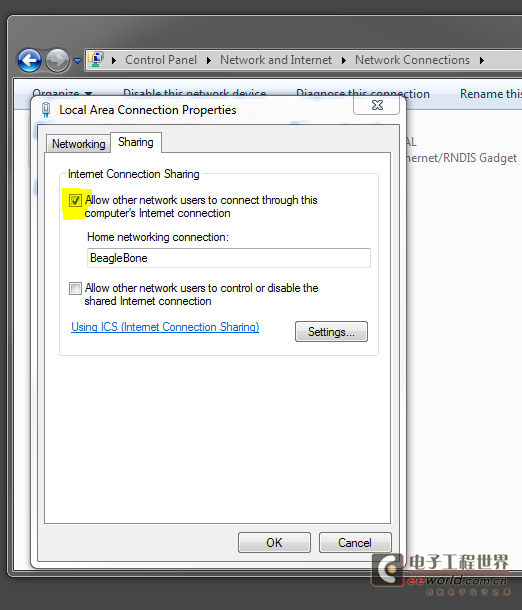
- Control Panel -> Network and Internet -> Network Connections
- Right-click your internet connection, Properties, Sharing Tab
- Click \"Allow other network users to connect thru this computer\'s Internet connection\"
- Select the BeagleBone Black\'s network connection under \"Home networking connection:\"
- Click OK.
Here\'s the trick: when I did this, Windows assigned a static IP to the BBB connection. Why? No idea.
You have to go back to that connection and reset it to DHCP.
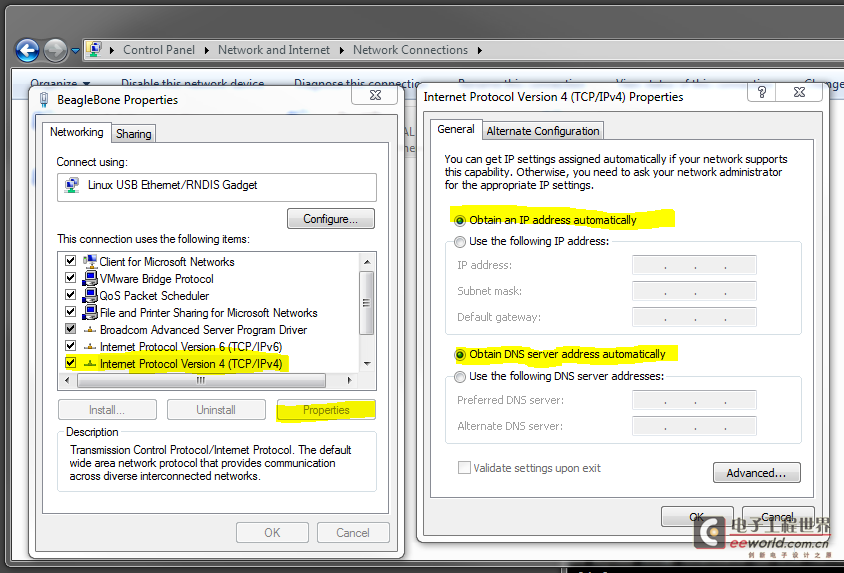
- Control Panel -> Network and Internet -> Network Connections
- Right-click the BeagleBone Black\'s connection, Properties
- Click Internet Protocol Version 4 (TCP/IPv4), Click Properties
- Click \"Optain an IP address automatically\"
- Click \"Obtain DNS server address automatically\"
- Click OK. Click CLOSE.
On the BBB:
This makes the BBB route internet traffic thru the host (Windows 7 in this case) and DNS thru Google\'s DNS Servers (8.8.8.8).
route add default gw 192.168.7.1
echo \"nameserver 8.8.8.8\" >> /etc/resolv.conf
Try It:
ping www.google.com
Make it Persistant:
To make this \"stick\" after a reboot of the BBB, you need to add these commands to the ethernet startup script on the BBB (/usr/bin/g-ether-load.sh).
NOTE: You CANNOT simply add these commands to the bottom of that script file. They must go before the udhcpd starts. It does not return control to the script so adding them at the bottom of the file does nothing for you. My script file now looks like this:
/sbin/ifconfig usb0 192.168.7.2 netmask 255.255.255.252
/sbin/route add default gw 192.168.7.1
echo \'nameserver 8.8.8.8\' >> /etc/resolv.conf
/usr/sbin/udhcpd -f -S /etc/udhcpd.conf
IT WORKS!
A big thanks to robert@rplural.net who got me moving in the right direction. Read his description of the parallel steps for a Linux host!
(javascript:;) ���ĺ���������̳�ĸ�����ͼƬ����鿴ԭ��������
����������̳������鿴�����������ݡ�

